I am convinced that modern embedded framework development is less about engineering and more about surviving a sequence of silently laid traps. I spent this past weekend trying to bring up code in src/radio on the new M5Stack Tab5—featuring the dual-architecture marriage of an ESP32-P4 and an ESP32-C6 Wi-Fi co-processor.

What should have been a straightforward exploration of a brand-new RISC-V application processor instead devolved into a multi-layered diagnostic nightmare. By Sunday night, I wasn’t just debugging code; I was literally jump-starting a stone-dead lithium-ion battery on a benchtop supply because the vendor’s Board Support Package (BSP) had silently signed its death warrant.

If you enjoy detective stories where the murder weapon is a rogue I2C initialization sequence, pull up a chair.

Layer 1: The Kconfig Mirage and the Missing Environment Variable

The fun starts before you even talk to hardware. When trying to compile the espressif__esp_hosted component to let the P4 talk to the C6, the toolchain grinds to a halt with a spectacular piece of technical gaslighting:

managed_components/espressif__esp_hosted/host/api/include/esp_hosted_config.h:59:2:
error: #error "Unknown Slave Target"

Why doesn’t it know what an ESP32-C6 is? Because espressif__esp_wifi_remote relies on a specific environment variable ($ESP_IDF_VERSION) to locate its own target definition files.

If you are running ESP-IDF 5.5.4, the native export script dutifully sets IDF_VERSION=5.5.4. But the component’s internal CMake logic is hardcoded to look for a truncated $ESP_IDF_VERSION=5.5. If that exact variable isn’t present, the build system doesn’t throw a warning. It doesn’t halt. It just silently skips sourcing the slave target definitions. The component ships broken out of the box.

The Canonical Recipe: You must manually export ESP_IDF_VERSION=5.5 before running idf.py build.

Layer 2: The Silicon Revision Time Machine

Once the build system stops hallucinating, you run into the next silent trap: the ESP-IDF defaults the ESP32-P4 to silicon revision 3.1.

This is fascinating because revision 3.1 hasn’t even shipped yet. The M5Stack Tab5 uses revision 1.0.

If you try to fix this in sdkconfig.defaults, you’ll quickly learn that Kconfig choice menus are notoriously sticky. Even with the right value in defaults, the choice will silently revert to the toolchain’s winner on every target set. Furthermore, the bootloader is built as an ExternalProject, meaning it doesn’t cleanly propagate sdkconfig changes through normal build invalidation.

To break out of the time machine and talk to the hardware currently sitting on your desk, you have to find the master boolean override: SELECTS_REV_LESS_V3=y in your sdkconfig.defaults.

When you build, check your actual active config:
grep CONFIG_ESP32P4_REV_MIN_100 sdkconfig

Only when that search returns =y (rather than being absent or # NOT SET) are you actually done with the toolchain and talking to the Rev 1.0 hardware.

Layer 3: The Wi-Fi Stub Illusion and the Missing Link

The ESP32-P4 has absolutely no Wi-Fi silicon on board. Yet, calling esp_wifi_init() runs flawlessly. No error codes, no diagnostics—just an empty void of silent zeroes returning from your APIs.

In our early efforts to see a firmware version on the C6 co-processor and read its MAC address, we hit this wall of zeroes. We initially misdiagnosed it as a transient power rail issue, assuming the C6 wasn’t waking up in time. To make sure it was awake, we reached into the BSP and enabled the Wi-Fi feature explicitly:

// Initialize IO Expander 1 (which hosts C6 power enable)
bsp_io_expander1_init();

// Power on the ESP32-C6 Wi-Fi co-processor via the BSP
ESP_LOGI("WiFiSystem", "Enabling ESP32-C6 Wi-Fi co-processor power...");
esp_err_t wifi_en_err = bsp_feature_enable(BSP_FEATURE_WIFI, true);

Spoiler: power wasn’t the issue. The real reason the C6 was acting like a ghost was a software missing link. To stop ESP-IDF from linking its dummy stubs and actually route the Wi-Fi API calls to the physical C6, you have to ensure esp_hosted is properly declared and that CONFIG_SLAVE_IDF_TARGET_ESP32C6 is actively selected. Once we fixed the component linking, the C6 woke up, returned a real MAC address, and we moved on.

But little did we know, that vestigial snippet of power-enable code we added during our misdiagnosis was hanging on the wall like Chekhov’s gun, waiting to fire in the second act.

Layer 4: The Silence of the Chargers

A day later, the real mystery began. I unplugged the Tab5 from my development host, and the device instantly died.

I pulled out the multi-meter. The battery is reading 0.0V. Not low. Not flagging. Monty Python parrot dead. I hooked it up to the benchtop supply, cranked it to 7.5V with a few hundred mA, and effectively jump-started the cells.

(Sidebar: If you find yourself doing this, limit your current and touch the cell occasionally to monitor its temperature. Having previously set a Li-Ion battery ablaze—a smell that never quite leaves your workspace—I was concerned, but apparently not concerned enough to not do it.)

The jump-start was successful! I did a quick test, removed the cable, and watched the device “coast” on battery for a few minutes. This gave me a false sense of security. I figured the battery was just having a bad day, and that leaving it plugged into my host for further development would charge it responsibly—much like joyriding in a car after jump-starting it to heal the battery with a charge from the alternator.

Demo time! Unplug from the computer… instant death. Back to 0.0V.

Naturally, it was time to look at the telemetry. Espressif has APIs for charging states and voltages, but in keeping with current traditions, they aren’t actually implemented for this board/chip combo. I glanced at the schematics, saw a plain old INA226 monitoring the rails, knocked out some quick boilerplate driver code, and read the registers directly.

The data was immediately whackadoodle:

  • With the battery removed, it read a floating phantom voltage of 1.08V.
  • Plug the battery in, and it drops to 0.
  • The isCharging bit was completely inverted because—in a stunning display of hardware engineering—they hooked the INA226 up backward.

But even after accounting for the backward bit, the chip was reading 0mA of charge current. Why? Because there was 0V being delivered to the battery terminals. I beat the local I2C I/O expander at address 0x44 with the biggest stick possible, forcing the charge enable (CHG_EN) bits high:

// Expander 0x44: CHG_EN, CHG_STAT, QC_EN, PWROFF, USB5V, WLAN_PWR.
// OUT_SET first: CHG_EN(7)=1, nCHG_QC_EN(5)=0 (QC enabled), WLAN_PWR_EN(0)=1.
write_expander_reg(bus, 0x44, IOEXP_REG_OUT_SET, 0b10000001); // CHG_EN (bit 7) = 1

// Verify CHG_EN actually landed
uint8_t out_set_readback = read_expander_reg(bus, 0x44, IOEXP_REG_OUT_SET);
ESP_LOGI(HW_TAG, "Expander 0x44 OUT_SET readback: 0x%02x", out_set_readback);

The register readback confirmed bit 7 was high. Yet, the battery terminals remained completely cold.

The Whodunit Revealed: Death by Global Reset

Here is the anatomy of the crime. Remember that initialization code from Layer 3?

Deep inside managed_components/espressif__m5stack_tab5/src/bsp_feature_en.c, the function bsp_feature_enable(BSP_FEATURE_WIFI, true) invokes bsp_io_expander1_init(). This internally configures the PI4IOE5V6408 driver for the I2C expander at 0x44.

The upstream driver’s initialization sequence issues a global reset to the expander chip.

A global reset reverts every single register on the multiplexer to power-on defaults. Every pin is wiped back to an input, and the output registers are totally zeroed out. This means every time the BSP touches the Wi-Fi feature, it silently obliterates the CHG_EN bit bit that tells the hardware charger IC to feed the battery. But it gets worse. That expander chip is the central nervous system for the board’s power. By resetting it, enabling the Wi-Fi using the vendor’s documented interface, the Wi-Fi initialization sequence is also acting as a serial killer for the USB 5V output, the Quick Charge negotiation, and the main system power-off latch.

[Your Code] -> Asserts CHG_EN (Battery tries to live
      ↓
[BSP Wi-Fi Init] -> Global Reset to Expander 0x44 -> CHG_EN = 0 (Silent Death)

The Post-Mortem Fixes

After a full day in this architectural loop of despair, the fix required two distinct steps:

  1. Purge the vestigial BSP Wi-Fi code. Getting rid of bsp_feature_enable stops the hardware expander from resetting itself into oblivion.
  2. Sanitize the telemetry logic. Invert the backward current direction on the INA226. Ignore any phantom voltage under 1.06V. Treat each divisor as exactly 1.25mV, and bypass any broken external scalers.

With those changes committed, reality has returned to the workbench. The telemetry now shows a responsible, slowly rising battery voltage, a couple hundred mA of charge current that drops cleanly to zero when full, and a steady 200mA discharge when the dual CPUs and Wi-Fi are cooking with the screen off. A full charge sits at 8216mV—spot-on for a 2S 18650 pack.

I’ve committed the fixes, documented the insanity in sdkconfig.defaults and AGENTS.md, and we will never lose this ground again. But let this be a lesson: if your ESP-IDF project is behaving weirdly, check your environment variables—and then check if your toolchain is trying to fire-sale your lithium infrastructure.

The TL;DR: ESP-IDF 5.5 / Tab5 Survival Checklist

To tie a bow on this murder mystery, here is the master punchlist for the next poor soul trying to get Wi-Fi working on an ESP32-P4 without accidentally executing their battery:

  1. The Environment Variable Penalty: You must export ESP_IDF_VERSION=5.5 before every single invocation of idf.py. If you forget, the build system detects the shift from 5.5 back to 5.5.4, assumes you are changing toolchains, and cheerfully triggers a 2,500-file recompile to punish you.
  2. The Component Linkage: Adding the espressif__esp_hosted component to your build isn’t enough. You must explicitly enable it in the configuration (CONFIG_SLAVE_IDF_TARGET_ESP32C6=y). If you skip this, the framework silently links the dummy stubs, leaving you staring at a wall of zeroes.
  3. The Silicon Revision Trap: Avoid the attractive nuisance of trying to manually set CONFIG_ESP32P4_REV_MIN_0, CONFIG_ESP_REV_MIN_FULL, or related variables. They are deeply intertwined, and Kconfig will stubbornly overwrite your choices with its own broken defaults. You must assert the master boolean (CONFIG_ESP32P4_SELECTS_REV_LESS_V3=y) to force it to respect Rev 1.0 hardware.
  4. The Battery Assassin: Never call bsp_feature_enable(BSP_FEATURE_WIFI, true). The resulting global I2C reset will nuke your battery charger, your USB 5V output, and your system power-off latch in one fell swoop.

This is an article I’m updating as I experience this device.
June 17. First update.
June 18, Hello World added.
Aug 16, 60 GPIOs. None free!

I was lucky enough to score one of the first Espressif S31-Korvo development boards. The board itself is a bit nifty as far as SBCs go, but let’s be honest, this is a development vehicle for their new darling of the development the ESP32-S31. It’s available from Espressif’s store on Aliexpress. (Brace yourself: shipping commands a premium, but I had five-day delivery to the U.S. once it shipped.) As an explorer, I won’t repeat the data sheet here, but I’ll focus on surprising things I learn along the way.

Espressif’s Naming

As with their entire lineup, it’s designed to confuse people. Here’s my take on it.

The chip is ESP32-S31 . That’s the 8 mm square part that most peole will never actually see.  When we talk about “ESP32-S31”, we’re mostly talking about the chip that’s inside the chip that’s inside the module that’s on a board. Whew! Matryoshka dolls all the way down

Most users will never really see the ESP32-S31. If you peek inside the module, you’ll find the actual core is packaged on the wafer next to a few passives and flash ROM in the upper left corner here. The PSRAM is stacked directly atop the main SOC silicon, harder to see in this picture from 3DPhotonix. (This is an ESP32-S3, but most modern modules follow this basic model.)

ESP32-S3 XRay
ESP32-S3 XRay

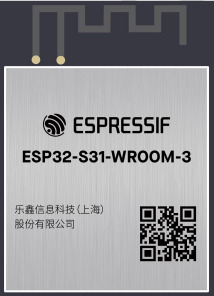
What most people will commonly call the “ESP32-S31” is the module. The module (usually) includes an antenna or antenna connector, the flash, and a handful of passives to stabilize the whole thing. That’s the familiar postage-stamp-sized thing with all the pins we see:

ESP32-S31 Module
ESP32-S31 Module

Espressif’s product line breaks down approximately like

  • ESP32-H: (Examples: ESP32-H2, ESP32-H4) Low-power. Targets IoT with funky radios
  • ESP32-C: (Ex ESP32-C2, ESP32-C3) – more performance, high-volume, single-core, simple connectivity
  • ESP32-S (Ex.: ESP32-S2, ESP32-S3, ESP32-S31:  high performance, rich networking connectivity, 
  • ESP32-P (Currently ESP32-P4): High performance, high connectivity for video (camera, screen) applications.

Notice how this categorization doesn’t really say what CPU core is used. Older parts are Xtensa; newer parts are RISC-V. Some people will scream that the ESP32-S31 shouldn’t cluster with ESP32-S3 because it’s RISC-V instead of XTensa. It’s probably borderline to say that it coudlhave been ESP32-S4 to help searchability, but I don’t pick the names.

ESP32-S31: Defined and Product Positioning

In product positioning, the ESP-S31 seems aimed to generationally replace the original ESP32 and the ESP32-S3, which featured higher performance, but notably misses a few key peripherals like legacy Bluetooth (adoption of audio BLE hasn’t really happened) and turns the knob to eleven for performance. 

It’s positioned a bit below the ESP32-P4 for performance, targeting “a maximum of 320 MHz,” while the ESP32-P4 promised 400Mhz. (To my great annoyance, they shipped a ton of what was essentially engineering samples that didn’t meet the published specs. They were 360 MHz parts, but they only changed the datasheets to reflect this after they’d shipped for about two years.) It doesn’t feature the MIPI interface, but it adds Gigabit Ethernet and, critically to a lot of people, a full collection of radios.

The reality of choosing chips in commercial products is that every gate and every pin for a feature you don’t need is cost wasted, so the ideal SOC has everything you need and nothing else. For most hobbyists or low-quantity development, it’s usually the case to standardize around a chip a little more featureful than you need, but at a budget that you don’t weep about. For example, I use ESP32-S3 in most of my projects, whether I need CANBus, err, TWAI, or not just because standardizing around a single toolchain is easier than trying to save a coin or two on a less featured part. Could I use some less expensive WCH32V part instead of an ESP32-C3 when I don’t need WiFi? Sure. But when ESP32-C3 Nanos are two bucks (often $1 on sale as a filler item), it’s easier to just keep them on hand as my goto low-end device. When I need a bit more chops, I waffle between the ESP32-S3 Supermini when size counts or an ESP32-S3 N8R16 DevKit-C clone when I need more pins or more RAM. I don’t stock the N4R2 variations that are $0.35 cheaper…because I’m a baller like that.

ESP32-S3 seemed logical to replace the original 2016 ESP32, but several omissions made that impractical. Notably, it brings back Classic Bluetooth, making it usable for audio Bluetooth. The original ESP32 had two DAC channels on GPIO25 and GPIO26. ESP32-S3 lacked DAC support completely. ESP32-S31 gives us two 10-bit and two 12-bit DACs. ESP32-S3 also surrendered SDIO slave mode and the Ethernet MAC. This meant that ESP32-S3 wasn’t just a slam-dunk replacement for the older part. ESP32-S31 “fixes” those omissions and adds many new internal peripherals.

ESP32-S31 adds (back) all of those. It raises the gigabit Ethernet option to a 1 Gbps interface. It adds WiFi 6 (probably borrowing from the ESP32-C6), which gives the reliability of 802.11AX for better handling in crowded WiFi environments. We go from 45 to 60 GPIOs, though in reality that number will never actually be available to everyone. We gain two more UARTs, raising the number to five. We gain three SPI controllers, reaching seven. We gain an I2C controller, giving us three. We get another LED PWM controller, giving us two. ESP32-S3 supported a maximum of 32MB of PSRAM, though only 2, 8, and 16MB were common. ESP32-S31 raises maximum addressable flash and PSRAM to 256MB and64 MB, respectively.

We also see peripherals that we’ve seen in newer models ESP32-C6 or ESP32-P4 added, like the advanced JPEG and 2D-DMA hardware acceleration for video, and a second generation touch sensor. 

  • PARLIO is for high-speed, parallel data streaming. It is highly optimized for routing parallel camera inputs or high-resolution displays.
  • BitScrambler is a new alternative to RMT and is reminiscent of the PIO engines in Raspberry Pi Pico. It’s a hardware programmable state machine located within the DMA path. to arbitrarily reorder, mask, or shift incoming/outgoing bits on the fly during data transfers, making it highly useful for direct generation of protocols (like WS2812 LEDs) or out-of-order data alignment without loading the CPU.
  • A hardware JPEG codec offloads CPU for rapid encoding and decoding.
  • The Pixel Processing Acelerator, PPA, is a dedicated 2D graphics accelerator used for image scaling, color space conversion, and basic 2D operations, significantly boosting GUI and HMI performance.
  • ASRC adds Hardware-level audio processing block designed to adjust digital audio sampling rates on the fly. 
  • The new radios get all the IoT buzzwords: WiFi 6, Thread and Zigbee

It’s like Espressif looked around their module collection that they already had IP for and turned on all the #ifdfefs. Kitchen sink included!

Presumably they learned a lesson from the P4 fiasco and are more forthcoming that this is currently an engineering sample part and they’re strongly branding it as such. To their credit, they’re providing very complete developer kits, a hundred-page datasheet and extensive technical reference manual.

Now as I write this, these are new. Very very new. They’re for developers to bring up their own products and evaluate for their own designs. There are rough spots.

  • ESP-IDF for ESP32-S31 is under active development. There was some support in 5.5, but yu probably want to follow master. (Observe that just changing the doc tage to ‘latest’ makes the page disappear.) It will probably be ESP-IDF 6.1 where S31 lands “for realsies”. I’d expect common operations (wiggling GPIO pins, std::cout, etc.) to land before every detail of every periphal described above is fully accessible.
  • The Espressif Forum has a section dedicated to ESp32-S31.
  • ESP-Arduino32 Is simply not ready. It’ll be Arduino4 and the patches being proposed so far make it clear that we’re in for another “dot oh” rough transition, as we incurred during the 3.0 transition a few years ago, though it looks less radical. They’ll need to land IDF 6.1 and then roll in new ESP32-S31 support for Arduino.

ESP32-S31: Need for Speed.

It’s designed to be fast. (Ahem. See later note on the difference between design and implementation…) Clock speed doesn’t tell the whole story. (Never has…Remember when a 60Mhz Pentium would beat up your 66Mhz 486 and take its lunch money? Well, it’s 1989 all over again.)

Architecture ESP32-S3 ESP32-S31 ESP32-S4
Max Clock Frequency 240 320 400
CoreMark/Mhz 5.54 6.86 6.228

Total CoreMark/td>

1329.92 2195.20 2491.20

CoreMark is an industry standard measure of performance in microcontrollers. Think of it as a modernized Dhrystone, but complicated enough that optimizers don’t recognize it and special-case the source code. The number in this table is “6.86”. It’s faster per clock cycle than the flagship ESP32-P4 (we assume it benefits from another three years of tuning) and it’s way faster per clock cycle than the Xtensa LX7 core in an S3 (which was alrealdy faster than the LX6 in original ESP32.) So we could expect a 240 MHz ESP32-S31 (no such configuration exists as of this writing) to be about 23.8% faster on compute-bound tasks than the familiar ESP32-S3, just by nature of rebuilding your source for it.

Development Boards

In this pre-launch state, there are two boards available from Espressif. The launch boards exist to help developers build their actual products. It lets us test code generation, built tooling, prototype with breadboards or connected breadbords, and generally decouple our own hardware and software development from the needs of the SoC.

ESP32-S31-Function-CoreBoard (I don’t know why “function” is in that name, but it is…) is the kind of obvious entrypoint. It’s inexpensive for even a hobbyst at about $25UD. This isn’t the board I have, so this isn’t discussed further.

ESP32-S31-Korvo-1 (I also don’t know if the “-1” is part of the name, but it is…) is a fully-featured board with electronics approximately similar to that of an Amazon Echo type of product. 
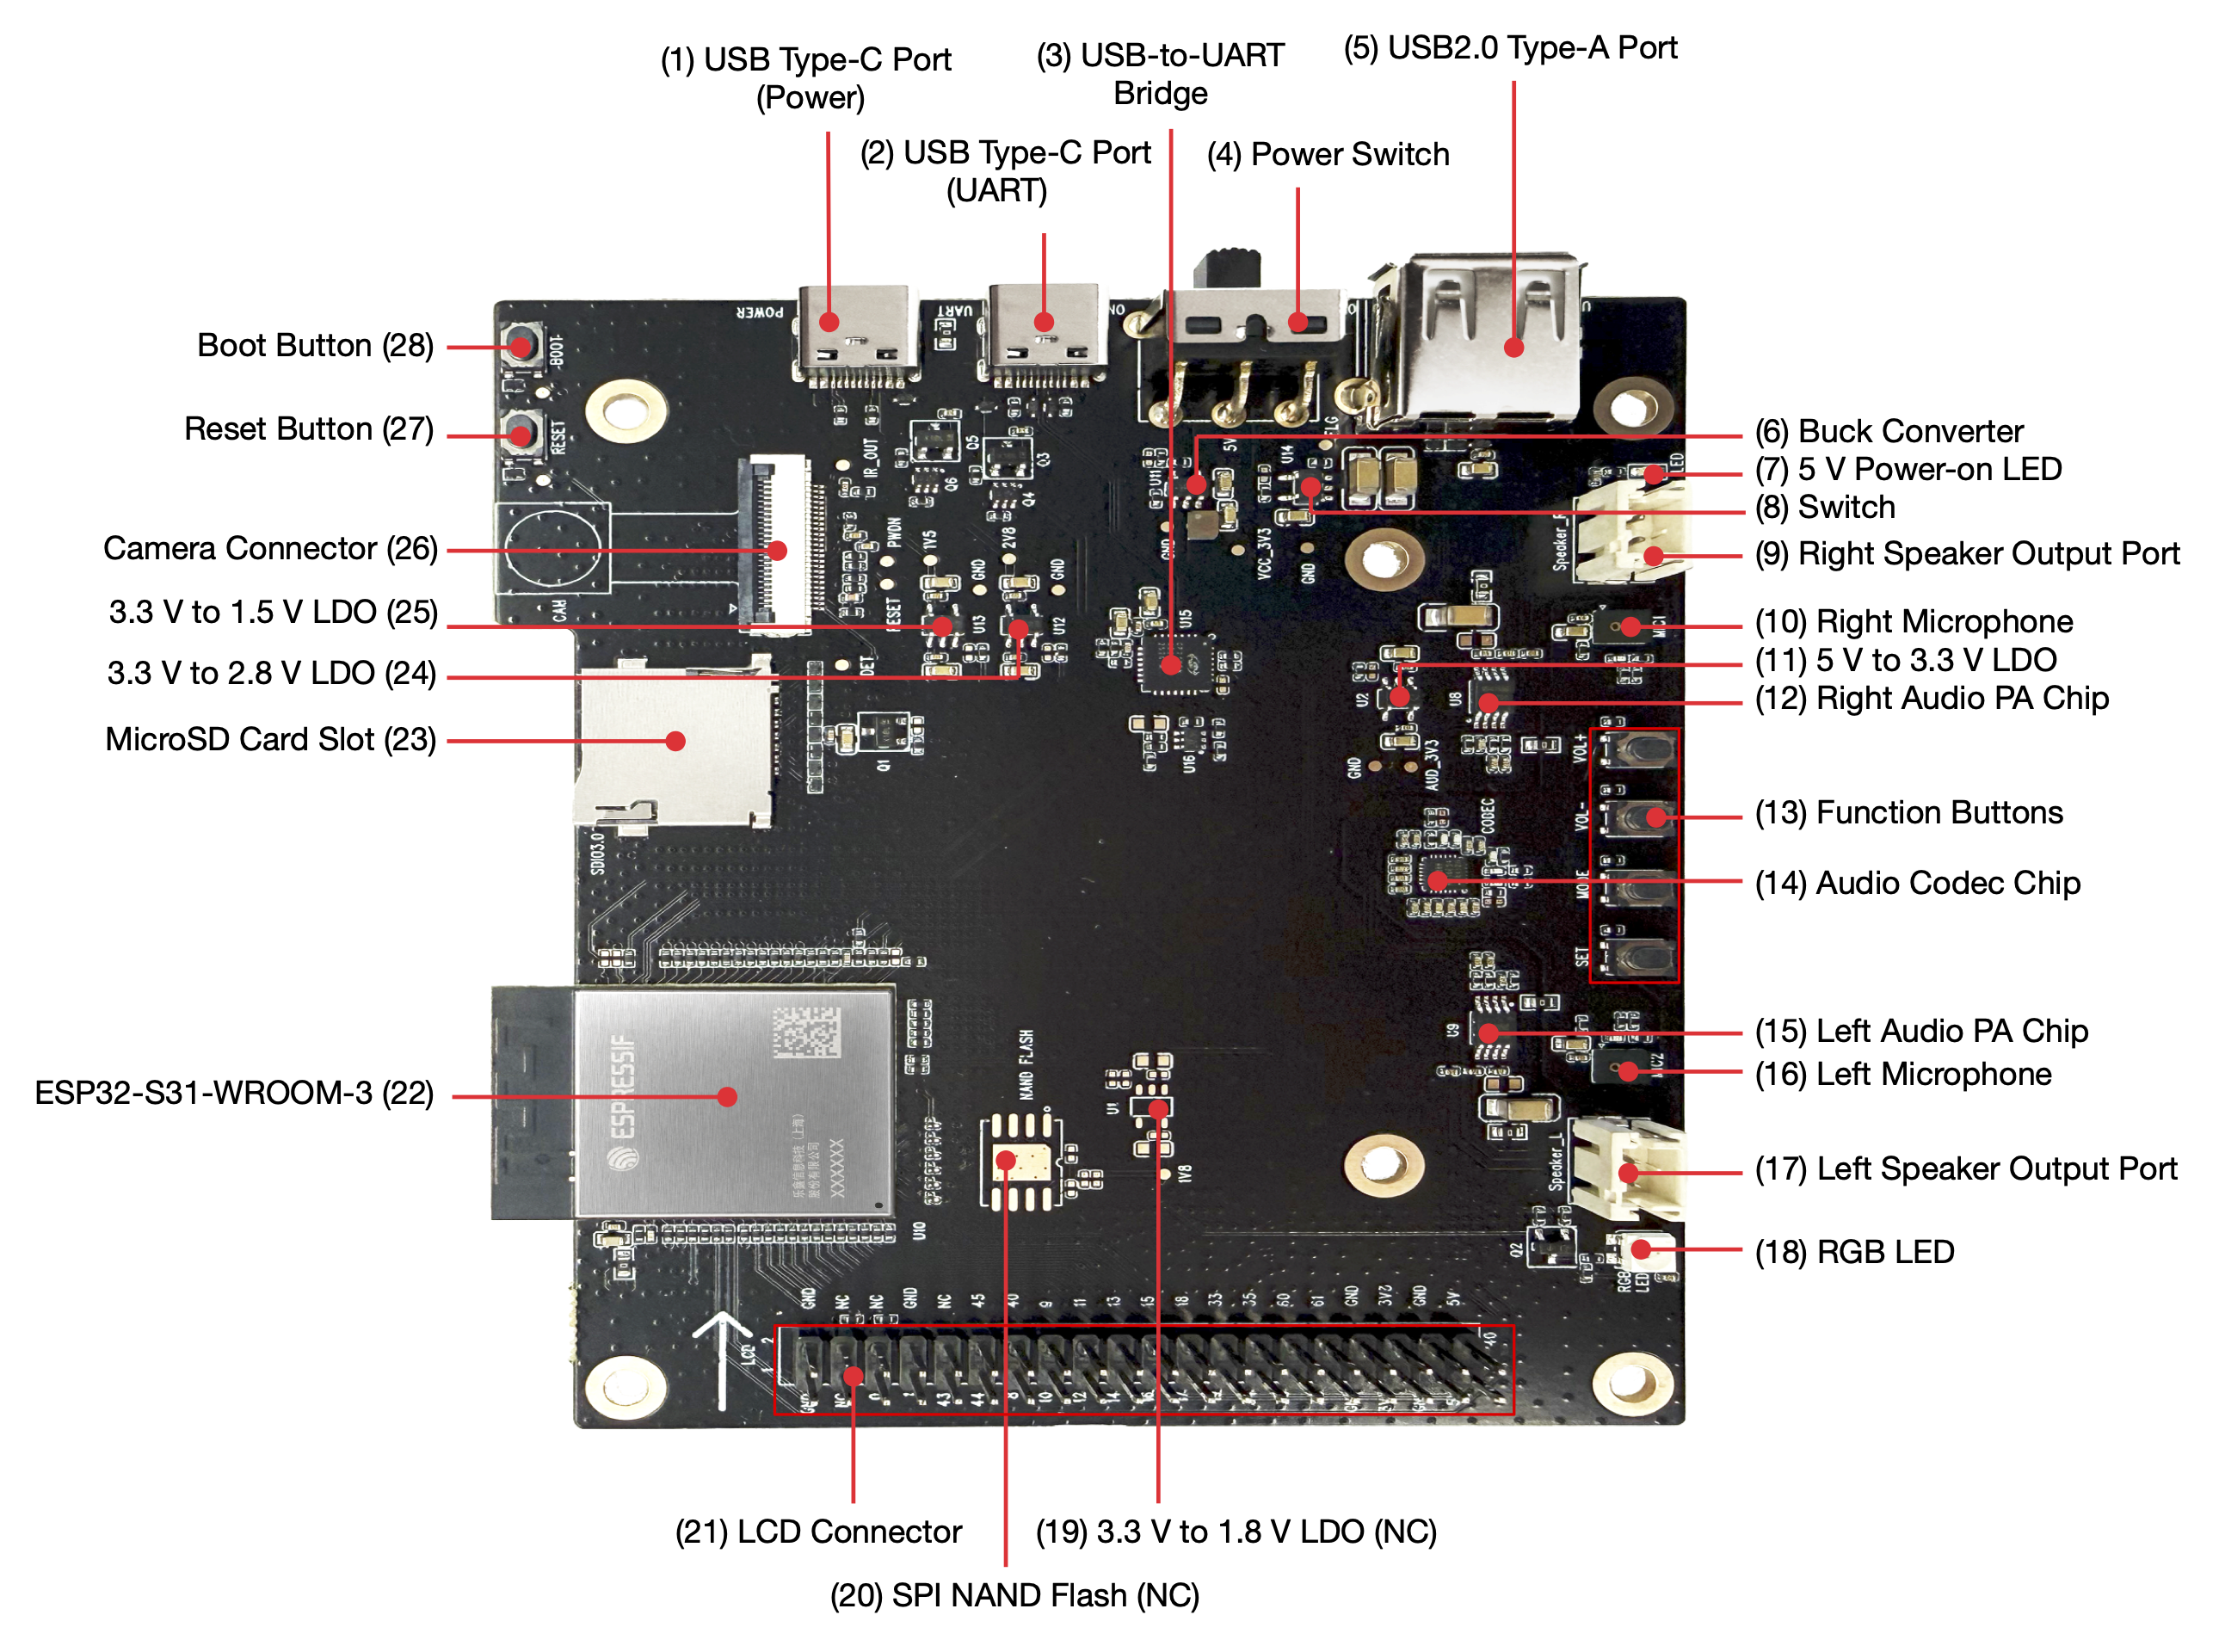
Hands-on with the board

One aspect of this board that’s impressive on its own is that while the ESP32-S31 has the most GPIO pins of any Espressif component to date, all sixty of them are connected and put to use on this board.  If you’re expecting to be able to breadboard with it, be prepared to give up the satellite board that homes the camera and screen as they’re using the majority of the the available pins. The RGB LCD alone gets 23 pins; the DVP camera another 13.

The board seems well designed. Schematics are provided. In development board traditoin, this is implicit permission to borrow liberally from their design. After all, a board developed by the makers of the chip surely get the details right, right? (Perhaps there’s explicit permission. I didn’t dig deeply.)

I particularly like the note:

The microSD card and SPI NAND flash functions share GPIO20–GPIO25 on the ESP32-S31-WROOM-3 module. The board uses the microSD card function by default. To switch to the SPI NAND flash function, perform hardware rework: remove R7, R65, R66, R67, R68, and R69, and populate R22, R23, R1, R2, R3, R4, C6, R20, and U4. 

You want to use SPI NAND? There are pads on the board for you to install it. “Knock yourselves out, dudes!” 🙂

Having recently battled the M5Stack Tab5 that reused the same SPI bus for internal flash and the display, guaranteeing that the DMA can’t refresh the screen and do any file access at the same time, I appreciate that it seems everything is on a separate bus.

I also like that schematics for Korvo-1 are provided.

They’ve moved past their two-transistor design for DTR/RTS pins to wiggle the handshake… to an integrated BC847BDW1T1G to handle that duty.

Hands-on: USB pain

Both USB connectors hav e5.1k pulldowns on CC1 and CC2, ensuring the board will actually power up a complant USB-C Downward Facing Power device and signals a simple request for up to 3A from the host.  It’s sad that this has to be called out for a gold star 14 years after USB-C was introduced, but here we are.

Also sad in 2026, doubly so for a chip that is Espressif’s second to contain a high speed (that’s USB-speak for 480Mbps connection… from 2001) is that the USB-C connection is wired ONLY to a stupid Silicon Labs CP2102N:

$ lsusb
[ ... ]
Bus 003 Device 004: ID 10c4:ea60 Silicon Laboratories, Inc. CP2102N USB to UART Bridge Controller Serial:
[ ... ]

This is a terrible experience. USB/Serial is probably the least nimble (well, maybe HID beats it…) USB protocol for efficiency, but this means you’re still using USB 1.1-era speeds, can’t use the USB-C connector for … USB-C things like connecting keyboards, mice, network adapters, storage, etc. to the device itself  and, worst of all, it simply works badly. My first task was to back up the image in the factory flash. Espressif users know this drill. Since the data sheet says “Single-chip USB-to-UART bridge supporting up to 3 Mbps.”, we’ll start there.

$ esptool --baud 3000000 -p /dev/cu.usbserial-3110 read-flash 0 0x1000000 factory_image.bin
esptool v5.3.0
Connected to ESP32-S31 on /dev/cu.usbserial-3110:
Chip type: ESP32-S31 (revision v0.0)
[ ... ] 
Reading from 0x001db000 [==> ] 11.6% 1945600/16777216 bytes...
Reading from 0x001dc000 [==> ] 11.6% 1949696/16777216 bytes...
Reading from 0x002e8000 [====> ] 18.2% 3047424/16777216 bytes...
Hard resetting via RTS pin...
A fatal error occurred: Serial data stream stopped: Possible serial noise or corruption.

Well, we know that USB is an error-detecting, error-correcting protocol, so we can either credit the UART just being crappy or there being a bit error introduced on the 4cm separating the CP2102 and the ESP32-S31. (Narrator voice: smart money is on the former…) Well, clearly we’re the victim of alpha particles. Let’s just bang on repeat:

$ esptool --baud 3000000 -p /dev/cu.usbserial-3110 read-flash 0 0x1000000 factory_image2.bin
esptool v5.3.0
Connected to ESP32-S31 on /dev/cu.usbserial-3110:
Chip type: ESP32-S31 (revision v0.0)
Configuring flash size...
Reading from 0x00623000 [==========> ] 38.4% 6434816/16777216 bytes...
Hard resetting via RTS pin...
A fatal error occurred: Invalid head of packet (0xFF): Possible serial noise or corruption.

Well, hell. Let’s go down 30% from the published spec.

$ esptool --baud 2000000 -p /dev/cu.usbserial-3110 read-flash 0 0x1000000 factory_image2.bin
[ ... ]
Reading from 0x000a2000 [> ] 4.0% 663552/16777216 bytes...
Hard resetting via RTS pin...
A fatal error occurred: Invalid head of packet (0xE1): Possible serial noise or corruption.

Surely it’s reliable at 1/3 the published speed:

$ esptool --baud 1000000 -p /dev/cu.usbserial-3110 read-flash 0 0x1000000 factory_image2.bin
[ ... ] 
Reading from 0x00144000 [=> ] 7.9% 1327104/16777216 bytes...Hard resetting via RTS pin...
A fatal error occurred: Invalid head of packet (0x1B): Possible serial noise or corruption. 

OK, let’s halve that again!

$ esptool --baud 460800 -p /dev/cu.usbserial-3110 read-flash 0 0x1000000 factory_image2.bin
A fatal error occurred: Invalid head of packet (0xBF): Possible serial noise or corruption.

This isn’t funny. Let’s go down to speeds I was using for ASCII terminals in the 90’s


$ time esptool --baud 115200 -p /dev/cu.usbserial-3110 read-flash 0 0x1000000 factory_image2.bin

Configuring flash size…
Read 16777216 bytes from 0x00000000 in 1516.1 seconds (88.5 kbit/s) to ‘factory_image2.bin’.

Hard resetting via RTS pin…
esptool –baud 115200 -p /dev/cu.usbserial-3110 read-flash 0 0x1000000 60.63s user 24.04s system 5% cpu 25:18.17 total

So, in 2026, it can’t even saturate a 1990’s transfer speed…and managed to take 24CPU seconds on a 4.5Ghz CPU…to move the back-breaking mass of 16MB. (Not GB. MB…As perspective, Wikipedia shows the second USB flash drive ever was 16MB.) Of course, since it’s proven it’s untrustable, I then have to repeat it to be sure the resulting .bin actually transferred without error. That attempt took about as long.

But will it blend JTAG?

One of my absolute favorite features of Espressif products that’s a key feature is that the chip’s own USB controller actually implements two endpoints. The second one is the best known. It’s a CDC-ACM endpoint that, if you turn it on with KCONFIG(ESP-IDF) or -DARDUINO_USB_MODE and -DARDUINO_USB_CDC_ON_BOOT (Arduino) that the console gets plumbed to your USB controller. So without needing a pair of transistors or the cost of an external bridge, your device shows up as an emulated serial port to the host and console std::print and std::cout and std::cin (or printf if that’s how you roll) shows up. It’s very nifty. The lesser known endpoint zero provides a JTAG interface. You just run openocd -f board/esp32s3-builtin.cfg, start gdb, target remote:3333,(OK, and a bit of yadda yadda that's easy to automate) and you get full glorious JTAG so you can watchpoints, single step through code, including tricky code like  boot or interrupt handlers and go.  For most of us, that means you can get power, console, and debugging all with a single commodity cable. It gives you a great way to upload code or download collected samples or profiling data if you have slow or unreliable serial (ahem). 

The good news is that Espresssif does provide this in the ESP32-S31. The (expected) chapter on Debugging ESP32-S31 with OpenOCD (via USB) is present.

(from the setup, you know what’s coming next…)

The bad news is that this requires GPIO34 and GPIO35 (USB1P1_DP and USB1P1_DN) to be connected to the respective pins of the USB connector. They’re not. Those pins are plumbed to LCD_R5 and LCD_R6. No USB JTAG debugging for you.

But you can use the 4-pin classic MTDO/MTDI/MTCK/MTMS style with an ESP-PROG or other JTAG probe, right? Let’s see, those are GPIO54, 56, 55, and 57. I think I’ve sufficiently foreshadowed how this story ends. Those are DVP_PCLK and DVP_Y9-Y7. “Well, at least those are on the .100 posts and if you’re not using the LCD you can just DuPont those wires into place.” No. That’s the FPC 24-pin connector for the camera. There are surely people with the right tools and skills to tap into that camera connector and use them, but I’m not one of them.

USB – conclusion

The ‘high speed’ (USB 2.0) controller is actually plumbed to an USB-A connector of all things. So you can presumaby develop code to use TinyUSB to attach peripherals using the connector from the 1990’s, but you cannot attach a USB-C host device, like a computer, and use the board to present, say,>UVC (USB Video Class) to a host.. To a host computer, that USB-C connection as as archaic as dangling an external dongle and attaching duponts to TX, RX, and GND to a device from last century. It’s a pretty inexplicable implementation choice.

Let’s Build Code: ‘hello world’

Remember, this module is so new that it’s not even recognized in ESP-IDF 6.0.1, the current version as of this writing. It’s also completely unrecognized by chat.espressif.com so you have to find information via earch and a bit of fiddling with the version numbers in the URL in the deployed doc or the version spinner in the upper left corner of most pages on documnra

idf.py set-target esp32s31
Error: Invalid value for '{esp32|esp32s2|esp32c3|esp32s3|esp32c2|esp32c6|esp32h2|esp32p4|esp32c5|esp32c61|linux|esp32h21|esp32h4}': 'esp32s31' is not one of 'esp32', 'esp32s2', 'esp32c3', 'esp32s3', 'esp32c2', 'esp32c6', 'esp32h2', 'esp32p4', 'esp32c5', 'esp32c61', 'linux', 'esp32h21', 'esp32h4'.

Well, it was polite to be conclusive that ESP32-S31 was not something it trafficed in and to list the options. Fortunately, we know this is ‘just’ a RISC-V core (or three…) and RISC-V code emitters have been around for a long time, so we don’t have to fret about bringing up a new architecture. We also know that Espressif might not have released this yet, but have done extensive testing – enough to validate that spiffy preloaded coffee making app (bug report: did not receive espresso…) so it’s time to head for master. We’re off to see the (EIM) wizard…

$ eim wizard
[ ... ] 
? Please select all of the target platforms (ESP chips) ›
✔ all
⬚ esp32
⬚ esp32c2
⬚ esp32c3
⬚ esp32c5
⬚ esp32c6
⬚ esp32c61
⬚ esp32h2
⬚ esp32p4
⬚ esp32s2
⬚ esp32s3
⬚ esp32s31

Well, good. This definitely knows about ESP32-S31. Let’s choose a reasonable installation of master.

[ ... ]
You have successfully installed ESP-IDF
for using the ESP-IDF tools inside the terminal, you will find activation scripts inside the base install folder
sourcing the activation script will setup environment in the current terminal session
============================================
to activate the environment, run the following command in your terminal:
source "~/.espressif/tools/activate_idf_master.sh"
============================================
2026-06-19 01:54:33 - 1 - 06 - INFO - Wizard result: %{r}
2026-06-19 01:54:33 - 1 - 06 - INFO - Successfully installed IDF
2026-06-19 01:54:33 - 1 - 06 - INFO - Now you can start using IDF tools

So let’s do that:

source "~/.espressif/tools/activate_idf_master.sh"
Added environment variable ESP_IDF_VERSION = 6.2.0
[ ... ]

Environment setup complete for the current shell session.
These changes will be lost when you close this terminal.
You are now using IDF version 6.2.0.
eim select master

That’s interesting. I expected 6.1.0, but we scored 6.2.0. Whatever. Let’s roll with it.

I dug around in doc to find what wa supported and found there’s an official ESP31-S31 Status in ESP-IDF page that sets expectations of what will and won’t work. As I write this, the page was updated just a few hours ago, so welcome to the edge! Skimming the list, I’ve definitely used “production” parts with a lower percentage of tasks completed. I appreciate their honesty. It’s helpful to know that, say, floating point and Bitscrambler are believed to be fully supported, but Debug Watchpoints aren’t. (Since Korvo doesn’t support JTAG, that’s no skin off MY nose, but there are ESP32-S31s in other boards. So let’s rejoin the classic Hello World tutorial, already in progress since I ‘accidentally’ knew the first several steps…

$ hello_world    cp -r $IDF_PATH/examples/get-started/hello_world .
$ hello_world  cp -r $IDF_PATH/examples/get-started/hello_world .
$ hello_world  cd hello_world
$ hello_world  idf.py set-target esp32s31
$ hello_world  idf.py menuconfig

and we get a pretty familiar kconfig screen:
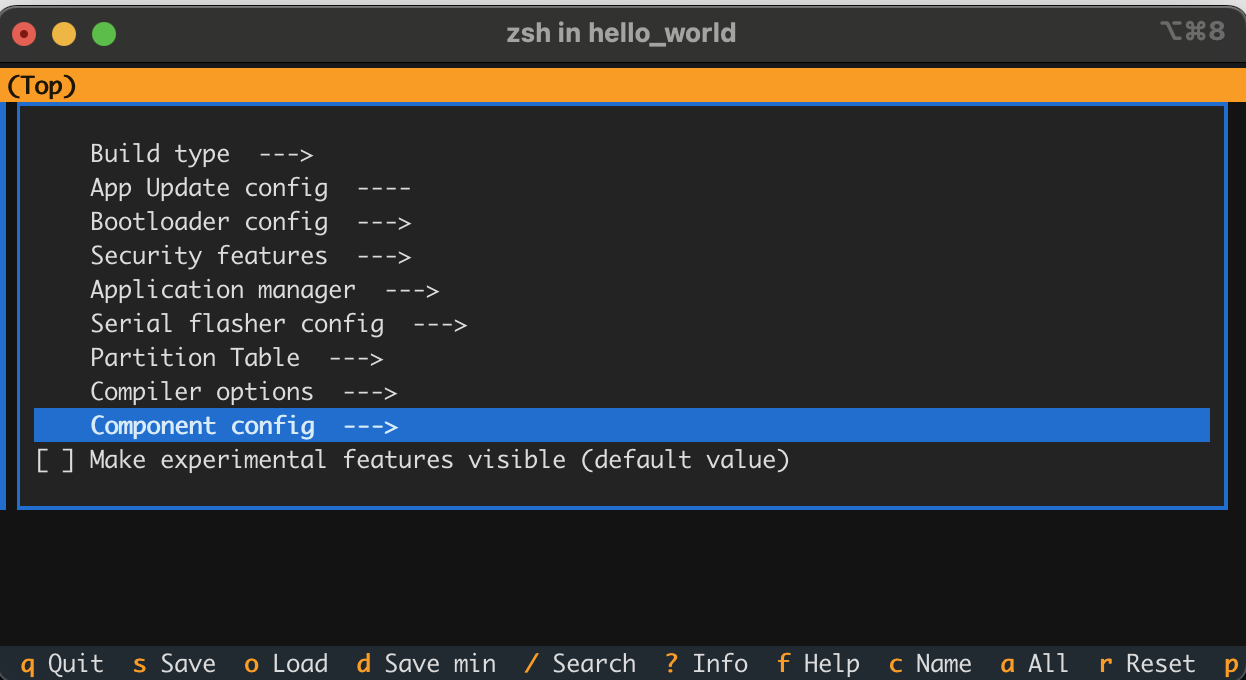
Now since hello_world doesn’t exactly need any WiFi credentials, SPI configuration, stack tweaking, etc. we don’t need to DO anything here; I’m just showing (like Espressif does) to imprint upon readers so they know it’s there when they need it. On to the bitslinging!

$ hello_world idf.py build
[525/530] Linking C static library esp-idf/main/libmain.a
[530/530] cd ~/sr...31/hello/hello_world/build/hello_world.bin
hello_world.bin binary size 0x1ee70 bytes. Smallest app partition is 0x100000 bytes. 0xe1190 bytes (88%) free.
[ ...  ] Project build complete. To flash, run:
idf.py flash
or
idf.py -p PORT flash
or
python -m esptool --chip esp32 -b 460800 --before default-reset --after hard-reset write-flash --flash-mode dio --flash-size 2MB --flash-freq 40m 0x1000 build/bootloader/bootloader.bin 0x8000 build/partition_table/partition-table.bin 0x10000 build/hello_world.bin
or from the "~/src/s31/hello/hello_world/build" directory
python -m esptool --chip esp32 -b 460800 --before default-reset --after hard-reset write-flash "@flash_args"
$ hello_world  idf.py --preview -p /dev/cu.usb* flash
Connecting...
A fatal error occurred: This chip is ESP32-S31, not ESP32. Wrong chip argument?

WTH?

$ hello_world  find . -name \*.obj | head -3 | xargs file
./build/CMakeFiles/hello_world.elf.dir/project_elf_src_esp32.c.obj: ELF 32-bit LSB relocatable, Tensilica Xtensa, version 1 (SYSV), not stripped
./build/bootloader/CMakeFiles/bootloader.elf.dir/project_elf_src_esp32.c.obj: ELF 32-bit LSB relocatable, Tensilica Xtensa, version 1 (SYSV), not stripped
./build/bootloader/esp-idf/bootloader_support/.../bootloader_support_esp_err_codes.c.obj: ELF 32-bit LSB relocatable, Tensilica Xtensa, version 1 (SYSV), with debug_info, not stripped

That certainly violates principle of least surprise. Let’s redo things we’ve already done.

$ hello_world  idf.py --preview set-target esp32-s31

Oho. If you don’t use –preview in the set-target, it will announce that it sets the target (and bugs you to include –preview) but it doesn’t actually set the target. Let’s rebuild.  Now when we run file on those same objects, we see:

./build/CMakeFiles/hello_world.elf.dir/project_elf_src_esp32s31.c.obj: ELF 32-bit LSB relocatable, UCB RISC-V, RVC, single-float ABI, version 1 (SYSV), not stripped

Let’s upload:

idf.py --preview -p /dev/cu.usb* flash

and we see the comfort that it’s now including ESP32-S31 action:

python -m esptool --chip esp32s31 -b 460800 --before default-reset --after hard-reset --no-stub write-flash --flash-mode dio --flash-size 2MB --flash-freq 80m 0x2000 build/bootloader/bootloader.bin 0x8000 build/partition_table/partition-table.bin 0x10000 build/hello_world.bin

So let’s peek at the serial line. Here’s one complete output cycle:

ESP-ROM:esp32s31-20251218
Build:Dec 18 2025
rst:0xc (SW_CPU_RESET),boot:0x78 (SPI_FAST_FLASH_BOOT)
Core0 Saved PC:0x2f004192
--- 0x2f004192: cpu_utility_ll_reset_cpu at ~/.espressif/master/esp-idf/components/hal/esp32s31/include/hal/cpu_utility_ll.h:24
--- (inlined by) esp_cpu_reset at ~/.espressif/master/esp-idf/components/esp_hw_support/cpu.c:49
Core1 Saved PC:0x2f0042da
--- 0x2f0042da: esp_cpu_wait_for_intr at ~/.espressif/master/esp-idf/components/esp_hw_support/cpu.c:57
SPI mode:DIO, clock div:1
load:0x2f0740c0,len:0x16a0
load:0x2f06a2b0,len:0xc34
--- 0x2f06a2b0: esp_bootloader_get_description at ~/.espressif/master/esp-idf/components/esp_bootloader_format/esp_bootloader_desc.c:40
load:0x2f06cfb0,len:0x337c
--- 0x2f06cfb0: is_xmc_chip_strict at ~/.espressif/master/esp-idf/components/bootloader_support/bootloader_flash/src/bootloader_flash.c:915
entry 0x2f06a2ba
--- 0x2f06a2ba: call_start_cpu0 at ~/.espressif/master/esp-idf/components/bootloader/subproject/main/bootloader_start.c:27
I (32) boot: ESP-IDF a602e67b 2nd stage bootloader
I (32) boot: compile time Jun 19 2026 02:48:21
I (32) boot: Multicore bootloader
I (34) boot: chip revision: v0.0
I (35) boot: efuse block revision: v0.0
I (39) boot.esp32s31: SPI Speed : 80MHz
I (43) boot.esp32s31: SPI Mode : DIO
I (46) boot.esp32s31: SPI Flash Size : 2MB
I (50) boot: Enabling RNG early entropy source...
I (55) boot: Partition Table:
I (57) boot: ## Label Usage Type ST Offset Length
I (64) boot: 0 nvs WiFi data 01 02 00009000 00006000
I (70) boot: 1 phy_init RF data 01 01 0000f000 00001000
I (77) boot: 2 factory factory app 00 00 00010000 00100000
I (84) boot: End of partition table
I (87) esp_image: segment 0: paddr=00010020 vaddr=40018020 size=075cch ( 30156) map
I (99) esp_image: segment 1: paddr=000175f4 vaddr=2f000000 size=00a24h ( 2596) load
I (102) esp_image: segment 2: paddr=00018020 vaddr=40000020 size=11b68h ( 72552) map
I (119) esp_image: segment 3: paddr=00029b90 vaddr=2f000a24 size=0a0fch ( 41212) load
I (127) esp_image: segment 4: paddr=00033c94 vaddr=2f00ab80 size=024d0h ( 9424) load
I (132) boot: Loaded app from partition at offset 0x10000
I (133) boot: Disabling RNG early entropy source...
I (145) cpu_start: Multicore app
I (154) cpu_start: GPIO 59 and 58 are used as console UART I/O pins
I (154) cpu_start: Pro cpu start user code
I (155) cpu_start: cpu freq: 320000000 Hz
I (156) app_init: Application information:
I (160) app_init: Project name: hello_world
I (164) app_init: App version: 1
I (168) app_init: Compile time: Jun 19 2026 02:48:21
I (173) app_init: ELF file SHA256: 9a6c37f27...
I (177) app_init: ESP-IDF: a602e67b
I (181) efuse_init: Min chip rev: v0.0
I (185) efuse_init: Max chip rev: v0.99
I (189) efuse_init: Chip rev: v0.0
I (193) heap_init: Initializing. RAM available for dynamic allocation:
I (199) heap_init: At 2F00E900 len 0006C6B0 (433 KiB): RAM
I (204) heap_init: At 2F07AFB0 len 000041C0 (16 KiB): RAM
I (210) heap_init: At 2E000000 len 00007FE8 (31 KiB): RTCRAM
I (215) spi_flash: detected chip: generic
I (218) spi_flash: flash io: dio
W (221) spi_flash: Detected size(16384k) larger than the size in the binary image header(2048k). Using the size in the binary image header.
I (234) sleep_gpio: Configure to isolate all GPIO pins in sleep state
I (240) sleep_gpio: Enable automatic switching of GPIO sleep configuration
I (247) main_task: Started on CPU0
I (247) main_task: Calling app_main()
Hello world!
This is esp32s31 chip with 2 CPU core(s), WiFi/BLE, 802.15.4 (Zigbee/Thread), silicon revision v0.0, 2MB external flash
Minimum free heap size: 478304 bytes
Restarting in 10 seconds...
Restarting in 9 seconds...
Restarting in 8 seconds...
Restarting in 7 seconds...
Restarting in 6 seconds...
Restarting in 5 seconds...
Restarting in 4 seconds...
Restarting in 3 seconds...
Restarting in 2 seconds...
Restarting in 1 seconds...
Restarting in 0 seconds...
Restarting now.

Perfect! We have taught our 300 MHz beast to count backward to ten…after printing hello world.

Next?

Hazards of Engineering Samples

This is a 300 MHz part. 🙁

60 GPIOs. Zero free

So I’m working on a project and successfully brought up the software on ESP32-S3 N8R16 (CYD), ESP32-P4 (Tab5), and Korvo. All I needed was to attach one teensy little little sensor.

and just like that, Korvo is out of the running…

Well, not just like that, I had engineering diligence to do. ESP32-S31 has 60 GPIOs; this should be easy. Let’s consult the official ESP32-S31 Korvo pinout.

Do you see all those unassigned pins? Yeah. Gulp. Twelve for the camera. Twenty-three (!) for the screen. (/me waves hand broadly) Five for audio. Six for SDIO. I won’t read the whole list. There are no available pins on this board if you want to use all the existing features.

I could, uuuuh.

  • Rob one from the sound, as my application doesn’t REALLY need sound. Stealing PA_CTRL would be kind of obvious.
  • Remove the camera connector and solder my pin to that connector or find a camera somewhere and cut up a ribbon connector.
  • Solder to the WS2812 at the bottom of the board. WS2812s are write-only, and my device was read-only.
  • Steal the boot button. It’s only read at boot. My code wouldn’t release the reset on the device that would start wiggling that pin until after boot, so that’s not totally crazy. Oh, they’re already overloading GPIO61 for the LCD’s SPI Clock.
  • I could use one of the buttons (Volume +/-, Set, Mode), right? Haha, Espressif already did this math. All four of those pins go to GPIO_42 with a unique resistor value in a resistor pulldown ladder into an ADC. Depending on if the value read is the difference of (I could do this math. I’m not going to) 10K and (13k, 6.8k, 3.3k, 1.3k) software can figure out which button is pressed. Software probably COULD figure out chords of multiple buttons, but I’m guessing most won’t.

There is *a glimmer of hope* I did actually find two pins—that I groused about earlier in this post—that are somewhat available and that are connected not only to pads that. a human could solder to, but that is brought out to a commodity connector. I could steal one of the USB pins that are USB_DP and USB_DM and rely on the internal GPIO pin mux to connect that to the peripheral I needed. Putting my sensor on a USB-A connector would give me power, ground, input, and the output that would be nice, but optional. It also seems pretty crazy…and still the least crazy of these options.

Epilogue: ESP32-S31 itself is a great chip and screams on my project. If you need exactly the peripherals that Korvo offers, it’s a nifty board to get your code up and running with screen, camera, and A/V-centric peripherals. If you need to add your own peripherals, you should probably instead be working with the Espressif ESP32-S31 Coreboard.
This doc will continue to grow…

This is just my notes from plugging it in and backing up the (awesome) factory demo. Next up: Hello World! (done)

Edit: Aug 22. Necessary changes

Edit: Neovim/LSP keybindings added

I’ve come to accept that I’m an old-school vi user. With about forty years of muscle memory behind that sentence, I’ll say that I’m an effective vi user, but in today’s world of C++ overrides, sentence-long symbols, and huge lists of available methods, I _have_ felt the occasional pang of jealosy and tried to move beyond bare bone vi. I’ll then sit back down at the terminal two days later, completely forget about that snazzy new editor that I told myself I’d learn, and immediately be back to a couple of iTerms with ack-grep just from habit. Making matters worse for myself, most of the time these days I work on ESP32 projects, so I’m dealing with cross compilers. Well, I’m not unhappy about that – having basically the same compiler on my embedded device as I do on my desktop is actually pretty sweet, but they’re always just different enough to be annoying. One difference that surfaces is that clangd-like services for Language Server Protocol (LSP) are usually just out of reach. One recent day when alternating between fighting CLion and vi (OK, it was probably actually vim; though I have flirtations with nvim.) I set out to win this battle.

It turns out there’s a slew of annoying behaviour you must overcome to get niceties to work. As is my style, I don’t declare this is the One True Way or even the Only Way. It’s just the journey that I took and I’m sharing it in the hopes that it saves you a few hours in your own journey. I’ll focus first on CLion and ESP32 because from there, “winning” with nvim is just an exercise in persistence. If it’s your goal to ignore CLion and focus on nvim or other clangd consumers, the steps to skip should be self-evident.

CLion claims to be able to use a platformio.ini. This is at best partially true. It can read the list of [env:] projects and give you a list of -e options that it will pass when shelling out to the (already slow and often broken) Platformio ‘pio’ command. By default, when given my (admittedly non-trivial, but hardly back-breaking) platformio.ini of 53 environments, we’re met with a red “Index 0 out of bounds for length 0”. No hint is given on what array was being indexed, what source file might be responsible, or even what language might have issued this error. All #included files are red squigglies because it can’t find them. No symbols have hover text unless they’re declared in the file you’re looking at, and syntax highlighting is about as effective as regex highlighting ever is on C++. Good job, Jetbrains.

Populate CLion’s shadow build system:

$ pio project init --ide clion

Resolving demo dependencies... (demo is the name of one environment in my platformio.ini that I'll use throughout)
Already up-to-date.
Updating metadata for the clion IDE...
Project has been successfully updated!

Restart CLion to see the changes.

$ open -a clion . (or whatever pointy clicky equivalent gives you joy)

It’s my experience, after probably a hundred restarts while developing this recipe, that this will fail on odd numbered invocations and pass on even numbered invocations… (Did I yet bitterly say “Good job, Jetbrains?”)

Now the bottom will show a blue progress bar during an ‘importing’ step that for me, takes about four minutes (!!) to complete. I have no idea why it takes long to analyze than it takes to completely build one or two of our targets, but I’m just a lowly bitslinger.

Restart CLion (twice) to see the changes.

Now it’ll still give the error and it still won’t convince you that it’s read platformio.ini, but it’s apparently necessary ritual sacrifice.

Build the Compilation “database”.

$ pio run -t compiledb -e demo

[ ... ]

Building in release mode
Building compilation database compile_commands.json

========================= [SUCCESS] Took 34.44 seconds =========================
Environment    Status    Duration
-------------  --------  ------------
demo           SUCCESS   00:00:34.439

========================= 1 succeeded in 00:00:34.439 =========================

Note that it will download and install all the packages required for all the builds (which is why I’m restricting it to ‘-e demo’ here or I’d be typing this until the cows came home. (Where do the cows GO anyway?) On my project, that’s about 20 libraries times 53 -e environments, so even though it’s not actually BUILDING much of anything, it’s still an exercise in persistence.

You now have a shiny new `compile_commands.json` file that describes what it would have invoked to build the software. Well, it doesn’t include the critical linking step, so it’s still not REALLY helpful if you’re trying to do what a ‘pio run’ would do, but it would tell you what the first 99% of a build will do. In my case, it’s 830 lines of blindingly dumb JSON that makes no attempt to factor out redundancy. These files ARE handy if you want to see what flags really really get applied to your build without looking at `-v`.

Purge the old CLion config

rm -fr .idea 

Now tell CLion to open that directory. It will recognize `compile_commands.json` and open it. The bottom of your tools menu will now have an option for Compilation Database. Your source tree will now show your source AND the zillion files in `~/.platformio/packages/framework-arduinoespressif32/libraries/*/src` that are ACTUALLY built. It also now knows where all your includes are as well as the system includes.

Notice that you can do OK living a bit of a lie here. The include paths for a lot of the system stuff actually change slightly depending if you’re targeting LX6 (ESP32-Classic), LX7 (ESP32-S2 or ESP32-S3) or RISC-V (everything else), but unless you’re working at the very bottom of the stack and NEED to know which source is used for the system stuff, it’s probably OK.  If it matters, you can repeat the pio run -t compiledb with a different -e and then reload the compilation database.

So this is great, right?

No. This is OK for editing in CLion, but you can’t actually BUILD in CLion this way. Despite giving it agonizing details of every invocation of g++, every one of the hundreds of `-I` flags and all that other stuff (look in `compile_commands.json`, seriously!) it won’t actually build code. You still have to open a window and `pio run -t upload -e foo` for that. There may be workarounds for that, but we’ll come back because vim is where work gets done while CLion is nice for fix-ups and clang warnings. Let’s forge on.

We have a great compile_commands.json, we can surely now rely on LSP support in nvim, right?

No.

We’re thwarted by many things. It seems that, despite having these agonizingly detailed roadmaps describing how to compile (almost) everything, both `clangd` and CLion have their own internal whitelists of toolchains. If your g++ binary isn’t whitelisted, it will silently fail and then try to invoke the native compiler. So the first time you hit, say `<vector>` or `<cstdio>` everything hits the fan because your MacOS or native Linux `/bin/g++`’s headers are in the “wrong” place and they call things that aren’t in the `-I` paths that are given. For MacOS, `_ansi.h` seems to be the poison pill, but if it weren’t that file, it would be something else.

I’ll skip ahead about two hours of debugging, but the solution lies in creating a .clangd in the root of your project’s directory to add the flags that you need and to strip the flags that nvim tries to add to the build that would choke your cross compiler, like anything starting with -m because you’re presumably compiling for a different machine architecture.

CompileFlags:
  Remove:
    - -m*
    - -fno-tree-switch-conversion
    - -fstrict-volatile-bitfields
    - -Wno-frame-address

  Add:
    - -nostdlibinc
    - -nostdinc++

I’ll fast-forward you through another two hours, though, and tell you that the `clangd` on Mac is so hell-bent on developing for Mac that it will ignore the above and STILL add things to its own include path that are toxic to the cross compiler. This is because Apple’s `/usr/bin/clangd` is a stripped-down, lobotomized version tied to Xcode that lacks standard features and stubbornly injects Apple-specific flags. The solution to this is to install `clangd` from Homebrew (`brew install llvm`) and then add a wrapper file (remember to mark it executable) in a directory in your `$PATH` that’s before the system binary. I already had `~/.local/bin/` in my PATH, so I’ll just add that.

My new ~/.local/bin/clangd:

#!/bin/sh

# Find the real clangd by listing ALL instances and skipping this wrapper
#REAL_CLANGD=$(which -a clangd | grep -v "\.local/bin/clangd" | head -n 1)

REAL_CLANGD=/opt/homebrew/opt/llvm/bin/clangd

# Execute it with the query-driver argument pointing to the global PlatformIO directory
exec "$REAL_CLANGD" --query-driver="$HOME/.platformio/packages/**/bin/*g++*,$HOME/.platformio/packages/**/bin/*gcc*" "$@"


Testing this mess without the editor

You’ll know this is in the game when you can do something like:

$ clangd --background-index --check=src/main.cpp 2>&1 | less

(Lipe-pro-tip: `–background-index` is generally a good flag to add in your editor setups so `clangd` can eagerly cache your project and make cross-file navigation instant.)

and see the  presence of:

I[01:22:30.648] Loading compilation database...
I[01:22:30.667] Loaded compilation database from ...
I[01:22:30.668] Compile command from CDB is:...

…and output that ends like:

I[01:23:24.137] All checks completed, 6 errors

It’s not important that it be zero. It’s important that it not be so many that clangd aborts. In fact, it’s even normal to have hundreds of lines like

E[01:23:24.130] IncludeCleaner: Failed to get an entry for resolved path : No such file or directory

or

E[01:25:02.807]     tweak: ExpandDeducedType ==> FAIL: Could not deduce type for 'auto' type

Despite these starting with “E:” and LOOKING like errors, this is expected.

** Note: if you tinker much with .clangd, it seems that a rm -fr .cache/clangd is sometimes needed. Since it’s not clear WHEN it’s needed and it tends to be pretty fast to just rebuild, if you’re working on this, just keep a rm -fr .clangd/cache ; nvim .clangd in your recall buffer.

NOW, you’ve slain the final boss between you and glorious nvim assisted by clangd via LSP.

<screenshot goes here>

Now, tab completion, hover, and auto clang-tidy all work sensibly. Victory!

But nvim screws up copy-paste?!?! Yeah, well…future battles to fight. *(Though if you want to skip the wrapper script entirely in Neovim, you can actually pass `–query-driver` directly in your `nvim-lspconfig` setup for `clangd` using the `cmd` table!)*

But I want to BUILD in CLion!

Since we bypassed CLion’s native PlatformIO integration (because it was choking on our 53 environments) and loaded the project as a bare Compilation Database, CLion doesn’t actually know *how* to compile your code. It just knows how to parse it. If you hit the hammer icon, nothing good happens.

To fix this, we need to teach CLion how to shell out to `pio`. We do this using Custom Build Targets.

1. Go to **Preferences / Settings -> Build, Execution, Deployment -> Custom Build Targets**.
2. Click the `+` to add a new target and call it something creative like “PIO Build”.
3. Next to the “Build” field, click the `…` to add an External Tool. 
4. Click `+` to add a new External Tool.

   – **Name**: `pio run demo`
   – **Program**: `pio` (or the full path like `~/.platformio/penv/bin/pio` if CLion’s `$PATH` is lacking)
   – **Arguments**: `run -e demo` (or whatever environment you want to actually build)
   – **Working directory**: `$ProjectFileDir$`

5. (Optional but helpful) Do the exact same thing for the “Clean” tool, passing `run -t clean -e demo` as the arguments
6. Save your new target.

Now, go to the Run/Debug Configurations dropdown in the toolbar (or **Run -> Edit Configurations**).

1. Click `+` and select **Custom Build Application**.
2. Set the **Target** to the “PIO Build” target you just created.
3. You can leave the Executable blank if you just want to build, or point it to your compiled `.elf` file if you have ambitions of setting up an Embedded GDB Server later.

Now you can smash that hammer icon or hit `Cmd+F9` (or your OS equivalent), and CLion will obediently shell out to PlatformIO, build your project, and dump the output in the console window.  If the native Platformio support worked, that’s all it would do for you anyway.

You’ve finally got the best of both worlds: CLion’s shiny graphical UI, proper code insight and navigation powered by your compilation database, and the actual build process correctly handled by PlatformIO. And when you’re ready to get real work done, your `.clangd` and wrapper script mean Neovim is sitting right there in your terminal, ready to go with full LSP support.

Take a victory lap. (And/or a beverage of your choosing.) You’ve earned it.


Shifting sands. Article changes.

I admittedly don’t use this configuration every day. I’d noticed that it had quit working, but I also wasn’t certain that I’d tested it on this exact configuration so I let it coast until that little rock in my shoe annoyed me enough to tackle it. Still, I knew my approach was sound but I couldn’t suss it out. Eventually, I asked my friend Gemini (Antigravity) to help. I’m leaving the above unedited because that probably works for some configurations. Here’s what we discovered.

  • On this system, my $HOME is a symlink to an external SSD. (Thank you, Apple for your extortionistic storage prices.) My ~/.local/bin/clangd suffered from a one-two punch of overly strict matching and an update to PlatformIO moving the internal platform file.• What changed: We pointed REAL_CLANGD away from Homebrew’s LLVM and directly to the esp-clangd binary installed by EIM (~/.espressif/tools/esp-clangd/…).
    The sneaky fix: EIM actually splits esp-clangd and esp-clang into two completely separate directories. This means the clangd binary doesn’t know where its own built-in headers are! We had to append –resource-dir=”~/.espressif/tools/esp-clang/…/lib/clang/21″ so it
    could find basic things like stddef.h. While we are here, we tweaked things so we only apply all this cleverness if we have a .platformio.ini containing the word “espressif” (so nvim on native projects still work) AND we dig around in the espressif tree to find the most recent esp-clangd.

    Updated file:

    $ cat ~/.local/bin/clangd
    
    
    #!/bin/sh
    
    # 1. Detect if we are inside an ESP32 PlatformIO project
    
    if [ -f "platformio.ini" ] && grep -qi "espressif" "platformio.ini"; then
    
        # 2. Dynamically find the newest esp-clangd and resource dirs
        ESP_CLANGD_DIR=$(ls -rd "$HOME"/.espressif/tools/esp-clangd/* 2>/dev/null | head -n 1)
    
        REAL_CLANGD="$ESP_CLANGD_DIR/esp-clangd/bin/clangd"
        ESP_CLANG_DIR=$(ls -rd "$HOME"/.espressif/tools/esp-clang/* 2>/dev/null | head -n 1)
        RESOURCE_DIR=$(ls -rd "$ESP_CLANG_DIR"/esp-clang/lib/clang/* 2>/dev/null | head -n 1)
    
        # 3. If the ESP tools exist, use them
        if [ -x "$REAL_CLANGD" ] && [ -d "$RESOURCE_DIR" ]; then
    
    exec "$REAL_CLANGD" \
    
         --query-driver="$HOME/.platformio/packages/**/bin/*g++*" \
         --resource-dir="$RESOURCE_DIR" \
         "$@"
        fi
        # If the ESP tools were missing, it safely falls through to the system default below
    fi
    
    # 4. We are NOT in an ESP project (or ESP tools are missing).
    # Fall back to standard desktop C++ clangd.
    # Find the first clangd that IS NOT this wrapper script itself.
    SYSTEM_CLANGD=$(which -a clangd | grep -v "\.local/bin/clangd" | head -n 1)
    
    if [ -n "$SYSTEM_CLANGD" ]; then
        exec "$SYSTEM_CLANGD" "$@"
    else
        echo "No system clangd found." >&2
        exit 1
    fi
    
    if [ -n "$SYSTEM_CLANGD" ]; then
        exec "$SYSTEM_CLANGD" "$@"
    else
        echo "No system clangd found." >&2
        exit 1
    fi
  • NeoVIM (AstroNVIM?) changed direction, requiring tweaks to the Neovim Config (~/.config/nvim/lua/plugins/astrolsp.lua)
    • What changed: We explicitly set cmd = { “/Users/robertlipe/.local/bin/clangd”, … } instead of just “clangd”.
    • Why it broke your previous setup: AstroNvim recently integrated Mason very tightly. If you just ask for “clangd”, Mason intercepts your $PATH and silently launches its own vanilla LLVM clangd. This completely bypassed your wrapper script, dropping your –query-driver argument, and putting you back to square one. Hardcoding the absolute path forces Neovim to respect your wrapper. Solution:Add a section under “servers…pyright” stanza

        servers = {
          -- "pyright"
        },
    
        -- customize language server configuration options passed to `lspconfig`
        ---@diagnostic disable: missing-fields
        config = {
          clangd = {
            cmd = {
              "/Users/robertlipe/.local/bin/clangd",
              "--background-index",
            },
            capabilities = { offsetEncoding = "utf-8" },
          },
        },
    
        -- customize how language servers are attached
        handlers = {
          -- a function without a key is simply the default handler, functions take two parameters, the server name and the configured options table for that server
    
  • I moved to C++26 and this made PlatformIO grumpy – Changes to .clangd required
    A few months ago, I bumped my minimum platform requirements to C++26 (because I can). PlatformIO adds its own –std= lines into the build and depending on the time of day, that can come before or after my own entry. GCC parses arguments left to right, so the last one standing ‘wins’. When calling clang-format, it was getting reset, so my
    static_assert(__cplusplus > 202002L, "This project requires C++26");
    was sending the parse down in flames.
    • What changed: We keep the Remove: block to strip out the GCC-specific optimization flags that cause warnings. However, we were able to delete -nostdlibinc and -nostdinc++. We have to add back the -std=gnu++2b flag.
    • Why it’s better: Because you’re now using Espressif’s custom clangd, it natively understands the Xtensa target. You no longer have to manually nuke the Apple standard headers because Espressif’s parser doesn’t confusingly fall back to macOS Mach-O headers anymore!You officially have the ultimate setup. No cosmetic #error in limits.h, native understanding of .iram1 ELF sections, and perfect C++ standard library resolution!


Appendix: Neovim/LSP Keybindings (the reason we do this…) 

Since this is largely documentation for myself, here, at no extra cost to you, is a subset of the keybindings that are most useful.

Feature Keybinding Lua Function/Command What it does
Hover Documentation K vim.lsp.buf.hover() Pops up a floating window showing the comment block, type info, and documentation for the symbol under your cursor.
Go to Definition gd vim.lsp.buf.definition() Jumps straight to where the variable, function, or class is defined.
Go to Declaration gD vim.lsp.buf.declaration() Jumps to the header declaration (very handy for C++ header/source splits).
Document Symbols gO vim.lsp.buf.document_symbol() Lists all methods, classes, and variables in the current file so you can fuzzy-search through them.Code Actions
Code Actions gra vim.lsp.buf.code_action() Fixes missing includes, implements virtual methods, or applies automated refactors.
Smart Rename grn vim.lsp.buf.rename() Renames a symbol safely across your entire project workspace.
Type Definition grt vim.lsp.buf.type_definition() Jumps to the underlying type definition of a variable.
Go to Implementation gri vim.lsp.buf.implementation() Jumps to subclasses or concrete implementations of a virtual interface.
Find References grr vim.lsp.buf.references() Scans your entire project and lists every place that symbol is used.


There is a more comprehensive version of Neovim LSP Keybindings

In a recent blog post, Espressif announced the ESP32-C2.  The Twitter thread from John Lee revealed an interesting twist; more on that in a moment. ESP32-C2 is a WiFi4 + BLE5.0 device with a single RISC-V core and 272MB of memory. It uses the familiar Espressif tools like ESP-IDF and frameworks such as ESP-Jumpstart and ESP-RainMaker.  It has on-chip ROM to reduce the need for common routines in flash.

Espressif is proud of the cost and radio performance of this device. Reducing power consumption was also a goal, which should help deliver this part into more IoT class projects.

ESP32-C2  is a low-cost WiFi chip supporting the Matter standard.

“Matter” is a royalty-free home automation connectivity standard, introduced late in 2019. Matter aims to reduce fragmentation across different vendors, and achieve interoperability among smart home devices and Internet of things and is backed by Amazon, Apple, Google, and other big names in that space. In the soon-to-be-released Matter 1st release, it supports WiFi, Thread, and Ethernet protocols.

With WiFi being so pervasive, devices like this supporting both WiFi and Matter Thread will be important for many years.

Doc for ESP32-C2 is available now. Chips are just starting to sample, with no availability date yet given.

But now, back to the scoop…

John Lee is a Senior Customer Support Representative at Espressif. He runs the @espressif Twitter account and is a good read. He originally posted the above announcement. I knew that Espressif’s last few chips (ESP32-C3, ESP32-C6) had been RISC-V, but I also knew they had a long run with CPU cores from Tensillica. One of the great tricks that Espressif pulled off with ESP32-C3 was treating replacing the CPU core as such a minor point that it barely was mentioned in the marketing doc and hardly even reflected in the chip’s name. I asked John for a clarification: “Are all C and H series going to be RISC-V?”. John quickly answered “Yes. In fact all of the subsequent chips are RISC V.” One of the things we gave up between ESP32 and ESP32-C3 was going down from two Tensillica cores to a single RISC-V core, so the natural question of multiple cores quickly followed.  John put that to rest with “Expecting to go up to 4 one of these days.” Hairs continued to be split and he confirmed that meant “”All” as on actually all next generation Espressif chips across all product lines will be RISC-V instead of Tensilica Xtensa? Not just the Cx series”.

That’s actually pretty big news on its own for RISC-V. Espressif is committing that all next generation products will be RISC-V and that at least some of them will be as large as four cores. Since Espressif has long been a leader of SoCs and Modules that package the SoCs with antennas, oscillators, and such into a single (usually certification-approved) package for both hobbyists and in the commercial space, this should result in a huge number of RISC-V cores hitting the market, even though they’re somewhat invisible as the user “just” wants to open a radio connection and not necessarily program the radio themselves.

Thank you for that scoop, John!