About this article: This preliminary attack on Buttons on BL60x with Nuttx can be thought of as an article that’s part of Lup’s Book on BL606 generally and his notes on Nuttx on BL60x specifically. As I was the one that made this experiment, I documented it for the rest of you. As a spoiler, the experiment failed, but we learned important lessons along the way and THOSE lessons are worth sharing more than the actual resulting button work.
Electrical switches, or in their more passing form, buttons, are as simple as it gets electrically. A button is like a piece of wire: it’s connected or it is not. It closes the circuit or it doesn’t. Mechanically, switches can take many forms like normally open (the wire is missing until it’s physically operated) or normally closed (pressing it removes the connection).
On the PineDio Stack, we have one push button that is connected to our BL604 SoC.. The push button is next to the internal LEDs and is connected internally to GPIO12.
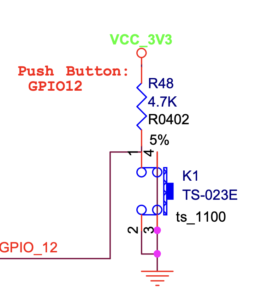
From the schematic, we see that GPIO12 is connected via a 4.7k resistor to the power rail. When open, the naturally resting position of this button, GPIO is left to float high because it’s wired to VCC via the R48 pullup resistor. This provides enough resistance to deliver voltage to prevent that pin from floating and is enough resistance that when we close pushbutton, driving GPIO12 to ground, we don’t risk the steadiness of our power source by shorting it even temporarily to ground.
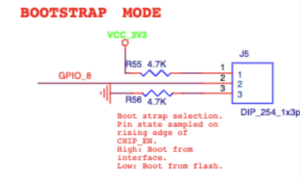
There is actually a second switch available in PineDio stack, but a bit subtle – in fact, by default, it’s missing! The GPIO8 pin that we jumper on boot is actually a form of a button. Whether by a button or a jumper, it can be connected to either the voltage source or the ground, Natively, that jumper/switch is read exactly once during bootup so the flash firmware can decide whether to run the flash reader or to run your code. As this tale isn’t about GPIO8 – indeed, using GPIO8 in your own designs would be questionable as closing that switch during power-on would result in your product “not booting” to the untrained eye – we shall ignore the GPIO8 pseudo-switch.
From the view of the BL604, our button on GPIO12 is an input and it is upon us to (somehow) configure it as such. We’ll take responsibility for that in a minute. We either read the +3.3V in the normal case or we read the 0V of ground when the button is pressed.
Each GPIO (16 on the BL602 and 23 on the BL604) can be configured as:
• Floating input
• Pull-up input
• Pull down input
• Pull-up interrupt input
• Pull-down interrupt input • Floating interrupt input
• Pull-up output
• Pull-down output
Our hardware designer here has helpfully provided us with external pull-ups to +3.3V, so we’ll configure it first as floating input and just read the button by polling it. This is OK if you’re accessing the button frequently or it’s a major component of your application’s life cycle. For example, the joystick buttons on PacMan are pretty much always being pressed in one direction and the game is doing little if it’s not, so it’s OK to dedicate the CPU to checking the buttons. A more typical application, which we’ll attempt later, lets the CPU receive an interrupt when the button status changes. For a stopwatch button or a screen menu change, that is a much more typical use as it frees your program execution from polling the button all the time.
Elsewhere in the schematic, we also see that the GPIO_12 pin can be used as an output to control the vibrator. We’ve since learned that option isn’t actually populated on the devices in our hands, so we’ll largely ignore the output options on GPIO_12.
Our BL602_BL604_RM_1.2_en Reference Manual has many dozens of pages dedicated to explaining how the GPIO pins work in great detail. While it’s perhaps helpful to know all the details (could the board designer have saved the cost of the pullup resistor if “Pull-up input” mode were known?) we will instead rely not only upon the GPIO functions of Nuttx, we will rely on the “Button” specializations.
In general speaking, there are two ways for a CPU to notice a change on a signal: it can generate an interrupt or it can poll that signal. For super precise timing or when the CPU has nothing else to do, polling is often preferred. For thing like a pushbutton that change quite infrequently, a processor interrupt is usually a designer’s choice.
The Nuttx Apps project provides an example Buttons app in apps/examples/buttons/, which is quite rich in features, but it can also be a bit overwhelming. We’ll instead create a smaller case more specialized for our hardware.
We set out to create a Nuttx application (not a driver) to learn about the button state. As such, we’d interface with the buttons through special files in /dev instead of using BL602-specific functions.
First, we confirm that we have Nuttx building and runnable on our hardware. Our /dev entry contains generic GPIO, but we need to specialize it.
ls /dev

/dev:

console

gpio0

gpio1

gpio2

i2c0

lcd0

null

spi0

spitest0

timer0

urandom

zero
Because we’re several episodes deep into these tutorials, we’ll touch on the steps, but not the details to wire up a new example. The recipe is very much the same as in the other chapters of the BL602 book.
$ cd apps/examples

$ mkdir button_test

$ cp tinycbor_test/* button_test

[ do a bunch of mechanical edits to make a “new” program - we’re sharing that here, so you don’t have to repeated it. ]

KConfig, Makefile are nearly a search and replace.

Button_test_main.c starts empty, with only a main() returning 0.
Instead of hand-editing things, we turn ourselves into the build process for now.
$ kconfig-tweak –enable CONFIG_EXAMPLES_BUTTON_TEST
$ make olddefconfig
$ make -j20
Perform a flash update, upload the program, and restart the demo
On the device, confirm that we’ve successfully linked our new build. Notice the presence of button_test:
# Builtin Apps:
  bas                      i2c                      sh

bl602_adc_test           ikea_air_quality_sensor  spi
              lorawan_test             spi_test

[ … ]
Now let’s start configuring our hardware.
Because GPIO in BL60x is currently in a transitional state, we’re just going to brute-force ourselves into the first entries. So in ./boards/risc-v/bl602/bl602evb/include/board.h we’ll just temporarily take over that slot from PineDio Stack. This is clearly not great for interoperability, but it sidesteps a number of issues that MisterTechBlog is already working on .
kconfig-tweak --enable CONFIG_ARCH_BUTTONS

kconfig-tweak --enable CONFIG_ARCH_IRQBUTTONS
N.B. These are included in our provided defconfig for this board, but for reasons I don’t understand, we still have to manually set them here to be effective.
make oldconfig
Rebuild Nuttx and reflash it to the board as you have in the other articles to follow along.
The best-laid plans of mice and men often go awry
Our original plan was to interface with the switch in all three ways that Nuttx knows how to do this, but the wheels fell off that idea while we were building it. (Yes, we did have wheels while we were building it because Lup and and I were consulting with each other and tag-teaming development, each working on different aspects.) If we did all this right, there would actually be nothing BL602-specific exposed in our test application and we’d have validated all our internal private handling. That latter bit was a success, in an awkward way – we validated that they didn’t work.
The three approaches are:
-
- Read the GPIO pin “raw”. Just open the device, read it, and report the status.
Configure the GPIO interrupt facility to let main() in our application do something else – or nothing else, such as just being in a sleep().
- Configure the Nuttx GPIO interrupt infrastructure. Success ultimately relies on an upper half running in application space and a lower half running in kernel space to deliver this interruption of event flow to the application to hop out to registered function names and handle these events.
- Configure the Nuttx button infrastructure, configured via CONFIG_ARCH_IRQBUTTONS to deliver an asynchronous event into the application to interrupt the flow and tell it that a button close or open event has been made. This actually relies on the above internally to work.
For any of these to work, we have to tell Nuttx where our buttons are we do this in board.h with an entry like this:
    #define BOARD_GPIO_INT1 (GPIO_INPUT | GPIO_PULLUP | \

        GPIO_FUNC_SWGPIO | GPIO_PIN12)
Get to the code!
While the order in the provided sample program flows slightly differently than is described, it’s hopefully recognizable. (The code is structured as it was to reduce repetition when we presented this in three different approaches.)
There’s no magic in dump_buffer(). It’s fortified to protect a (human) debugger from printing control characters or lengthy buffers directly to the screen, but it’s quite simple:
static void dump_buffer(const int buf_size, const char* buf) {

    for (int i = 0; i < buf_size; i++) {

        printf("%02x(%c) ", buf[i], isalnum(buf[i]) ? buf[i] : '.');

     }

}
Raw GPIO reads is the simplest.
int fd = open(INPUT_DEV_NAME, O_RDONLY);

for (int pass = 0; pass < count; pass++) {

  char ibuf[20];

  printf("Pass %d of %d:", pass, count);

  int c = read(fd, ibuf, sizeof(ibuf) - 1);

  dump_buffer(c, ibuf);

  if (c > 0) {

    if (ibuf[0] == '0') {

        printf("- Pressed");

    }

  putchar('\n');

}

lseek(fd, 0L, SEEK_SET);

usleep(500000);

close(fd);
This simply checks if the GPIO pin is active, printing anything we get from the GPIO port in hex and in ASCII and adds “active” if so. By default, we check the button rather arbitrarily 20 times and we sleep half a second between passes. This provides a nice feedback loop allowing you to press and release the button a few times and see the screen change in response.
There are really only two lines that may be worthy of surprise. First, the data as we display in dump_buffer() and as we test in the zeroth byte of ibuf[] is not a binary 0 and 1 as you might expect. They are ASCII ‘0’ and ‘1’ (0x30 and 0x31) respectively. This might be a bit surprising to those experienced with device driver handling as you might expect a more raw 0 and 1 there. This is actually a peace offering to command-line users of the GPIO drivers; it’s simply convenient to be able to cat (or hexdump or read…) a port and see its status. It’s similarly convenient to be able to write to it via ‘echo 1 > /dev/whatever’ to blink an LED or start a motor or anything else that may be an output on this same driver. So the ASCII convention actually is convenient here.
The second potential sharp edge is that streaming reads of the GPIO node will not stream reads. You may expect to ‘cat /dev/gpioin0’ and see a stream of 1s until you press the button, at which point you’d see a stream of zeroes until you released the button. Adjust your expectation. Again, presumably for compatibility with command line tools that keep a short lifecycle of a device’s file descriptor, only the very first byte of that potential bytestream is ever valid. You could close and reopen the device to get back to the beginning, but that’s a bit costly as it increases the total number of potential system calls, the transitioning edge between OS application code and kernel mode. We thus use lseek() to just to back to the beginning and read it again.
This is all jolly well and very satisfying. We’ve hooked up a button logically to the operating system and we’re now able to read it and do something useful with it.
“And then, the murders began…”
Filled with confidence, I proceeded to code up the approach of using GPIO interrupts into user applications. Knowing that we needed to ultimately allow for device with way more than the single button on PineDio Stack, we thought about the configuration scheme. The existing scheme is a series of entries in board.h like this:
#define BOARD_GPIO_INT1 (GPIO_INPUT | GPIO_PULLUP | \
GPIO_FUNC_SWGPIO | GPIO_PIN12)
Initially, we ran into problems if the same pin were configured to be both an output and in input. On PindDio Stack, sharing the button with the vibe didn’t seem completely unreasonable. We could, perhaps, keep the port as an input most of the time and only change the direction when we knew we needed that GPIO line to be an interrupt. We’d lose button functionality while vibing, but that didn’t seem so bad. We put a TODO in the code and vowed to come back to that. Still, that killed most of a day to learn that lesson. (Spoiler: you just can’t do that on this chip. You HAVE to reverse the pin.)
We knew the dance between
#define BOARD_NGPIOIN 1 /* Amount of GPIO Input pins */
#define BOARD_NGPIOOUT 1 /* Amount of GPIO Output pins */
#define BOARD_NGPIOINT 1 /* Amount of GPIO Input w/ Interruption pins */
And
#define BOARD_GPIO_IN1 (GPIO_INPUT | GPIO_FLOAT | \
GPIO_FUNC_SWGPIO | GPIO_PIN10)
#define BOARD_GPIO_OUT1 (GPIO_OUTPUT | GPIO_PULLUP | \
GPIO_FUNC_SWGPIO | GPIO_PIN15)
#define BOARD_GPIO_INT1 (GPIO_INPUT | GPIO_FLOAT | \
GPIO_FUNC_SWGPIO | GPIO_PIN19)
…and we knew those blocks were precarious. Keeping them in sync is awkward. We’d debugged those before and fixed several issues there. It certainly killed our demo app to not be able to have a pin readable as both an _IN1 and _INT1 device, but we thought we’d proceed and come back to it. Another TODO.
We talked about the potentially large numbers of buttons (even if multiplexed into a keyboard multiplexing layer, as is possible on the BL702/704/706) of this and we thought about the number of places in the BL602 code that were passing around bitmaps of the available pins in uint8_t’s. We fixed as many as we could, but that hung in our mind of needing consideration. Add a TODO.
We knew that several stars had to align in order to actually receive an interrupt on a pin at the hardware level. The interrupt source needs to be present, e.g. by pressing a button. The GPIO register itself has to have that port configured as an interrupt source. The GPIO global register has to unmask that interrupt. The CPU has to enable interrupts for the GPIO by setting the correct bit in BL602_IRQ_GPIO_INT0. The mask on the CPU core itself needs that interrupt enabled. Of course, an interrupt vector has to be present for the CPU core and successfully jumped through and that code then has to find an appropriate function registered at BL602 portability layer which is then responsible for calling the function registered in user layers. It just didn’t work.
We found that sometimes, replacing the portable interrupt or GPIO abstractions with the BL602-specific layers would sometimes help – and sometimes made them worse. It was definitely making the code less maintainable and simply doing unnatural things to the (otherwise sensible) abstraction models.
We started thinking through cases of pins being shared, such as in our vibe + button case and our interrupt + traditional read case. We also started having issues modeling hardware that was similar, but not quite the same and figuring out how that would map into shared apps that needed different configurations and thus, different board.h entries.
The TODOs kept piling up for code that was missing or just wrong. It was not pretty…and we weren’t getting particularly close to working code for what should have been a simple demo. The BL602 layer was, amongst many problems, just not compatible with the shared upper/lower split model that was needed for the final two approaches we sat out to write.
The good news is that there was light in the proverbial tunnel for us.
The current BL602 implementation used a very simple model of GPIO pins that was expecting a low count of input, output, and interrupt pins that were all independent and manually configured. We were clearly outgrowing that model. The other model offer in Nuttx was already on our radar as something we were going to have to implement soon-ish. Interrupt Expanders in Nuttx allow a 1:1 mapping between a device’s physical pin and its name in the /dev tree. They do away with the entries in config.h
While I was struggling with this code, Lup was coming off wrangling the SPIO driver for the display and working on the touch driver. Both of those were ALSO running into related issues in the BL602 port of Nuttx. Lup had already recognized that we were falling into the “sunken cost” development fallacy.
For example, we were each implementing hacks in the BL602 port (such as copying entire sections of code just to manipulate a single bit differently because the common code didn’t have access to the needed info to know the direction and type of the port) and the needed types were static and private.
This was our breaking point.
I had to take a few days away from the code for personal reasons and Lup reprioritized the next chapter in his book to be “Implement GPIO and Interrupt Expander” so we could get all three of these drivers (screen, touch, button) back on track with portable code being portable and possibly all working at the same time – something we couldn’t really do with the board.h model.
This article is both a bridge between some of the gaps in recent articles to explain the issues that necessitated the development of the GPIO Expander in Nuttx and to act as a placeholder until we can roll in a sensible button handler.
Thank you for reading this far and thank you for your patience while we sort this all out. Enhancing and fixing the bottom parts of the Nuttx BL02 part has been challenging and and distracting relative to the projects we’ve set out to undertake, but we hope you’ll find the results useful. We hope to provide enough encouragement and background for others to help in that journey and build upon it for both the public tree and in your own projects.